Recently, our li'l one started humming "A B C D.... X Y Z now I know my A B C next time wouldn't you sing with me? " and then gradually he started pointing out to letters, it was then we thought about the so called "Alphabet Wall" in his playroom.
It's definitely not a difficult task to finish it if you are doing it for your own kids :) Trust me, you will enjoy doing it. So did we !!
We didn't want to stick to one particular kind like animals, things etc. If you like to depict an animal for each letter , that's also a brilliant idea. We chose some based on his favorites and some that we would like to teach him like Traffic light etc.

1) All the 26 Letters - Plain white. We got it from Michaels (USA), because it had various styles for each letter, so there is an option to pick one of our choice among many.
2) Acrylic Paints - I picked all the bright colors , because kids love bright colors. Don't forget the basic colors like white, black and brown. Rest is your choice.
3) Paint brushes - you will need various thickness. (both round and flat)
4) Craft papers - different colors based on your need. Thicker sheets would stay firm when stuck to the letter.
5) Satin Ribbon - 2 colors , 1 is red for Jelly fish 2 is Yellow for Queen.
6) Eyes - a pack containing various sizes
7) Peacock feathers - got it from Michaels
8) Krazy Glue - we used this
9) Elmer's Glue
10) Buttons - Black and Red color (Of course, it depends on your choice )
11) Chenile Stems - Black pack and multi color pack. Could get it from Walmart / Michaels.
12) A pair of scissors
13) Carving pen/knife - we used this
14) 3M Command Strips to stick to the wall - we used these could get it from Amazon, Walmart, Target etc
15) A pencil for outlines


All you need to do is take the letter A . Using lower case for the letter A is more apt.

All you need is take the letter b (we chose lower, you could make it with Upper as well)

All you need to do is take the Letter C

All you need to do is take the letter d (upper case)


Letter H for House:


Needless to say , used Black, green, red and orange colors.


Zebra is the easiest of all we did :)
Paste all these letters on the wall (Please dedicate one wall of your kids playroom or nursery for a better look) using 3M Command strips. Initially get a sample of command strips and test it to see if it holds the letter good.
I hope you like it. I am sure you all are gonna enjoy doing this. Good luck :)
It's definitely not a difficult task to finish it if you are doing it for your own kids :) Trust me, you will enjoy doing it. So did we !!
We didn't want to stick to one particular kind like animals, things etc. If you like to depict an animal for each letter , that's also a brilliant idea. We chose some based on his favorites and some that we would like to teach him like Traffic light etc.
Things you need:
1) All the 26 Letters - Plain white. We got it from Michaels (USA), because it had various styles for each letter, so there is an option to pick one of our choice among many.
2) Acrylic Paints - I picked all the bright colors , because kids love bright colors. Don't forget the basic colors like white, black and brown. Rest is your choice.
3) Paint brushes - you will need various thickness. (both round and flat)
4) Craft papers - different colors based on your need. Thicker sheets would stay firm when stuck to the letter.
5) Satin Ribbon - 2 colors , 1 is red for Jelly fish 2 is Yellow for Queen.
6) Eyes - a pack containing various sizes
7) Peacock feathers - got it from Michaels
8) Krazy Glue - we used this
9) Elmer's Glue
10) Buttons - Black and Red color (Of course, it depends on your choice )
11) Chenile Stems - Black pack and multi color pack. Could get it from Walmart / Michaels.
12) A pair of scissors
13) Carving pen/knife - we used this
14) 3M Command Strips to stick to the wall - we used these could get it from Amazon, Walmart, Target etc
15) A pencil for outlines
Letter A for Apple:
All you need to do is take the letter A . Using lower case for the letter A is more apt.
- Paint it in red. Let the paint dry.
- Cut a brown colored Chenile Stem, and stick it at the back of the letter using Krazy glue.
- Carve out two leaves from the Green colored craft paper using carving pen.
- Paste the two leaves on either side of the stem using Krazy glue.
Letter B for Bee :
All you need is take the letter b (we chose lower, you could make it with Upper as well)
- Pain the letter in yellow color. Let the paint dry.
- Using a thin brush, draw black colored waves on the lower half of the letter.
- Carve out two circles from the black colored craft paper using carving pen.
- Paste the circles as shown above using Elmer's glue.
- Cut two small black color Chenile stems and bend them as above.
- Paste them at the back of the letter using Krazy glue.
Letter C for Car:
All you need to do is take the Letter C
- Paint it all over with any color of your choice. Let the paint dry .
- Paste two big black colored buttons at the bottom of the letter as shown above using Krazy glue.
Letter D for Duck:
All you need to do is take the letter d (upper case)
- Paint the letter in Yellow. Let the paint dry.
- Carve out two legs (star shape) and a mouth (heart shape) from the orange colored craft paper using carving pen.
- Carve out face and a wing as shown above from the yellow colored craft paper using carving pen.
- Stick the carved out mouth (heart shape) to the face using Elmer's glue .
- Stick/ paste an eye to the face using Elmer's glue.
- Stick the rest as shown above using Elmer's glue.
Letter E for Elephant:
- Paint the letter in Grey (we mixed black and white to get Grey ), let the paint dry.
- Carve out an ear and a truck from grey colored craft paper using carving knife/pen.
- Carve out a white tooth from white colored craft sheet (its almost invisible in the above picture :) )
- Paste an eye of desired size as shown above using Elmer's glue.
- Paste the ear and trunk as shown above using Elmer's glue.
Letter F for Frog:
- We chose the Upper case for the letter 'F'.
- Paint the letter in green and let it dry.
- Carve out a circle(for face) with small circles over the head to hold the eyes from green colored craft paper.
- Now, the size of the bigger circle above depends on the size of the F you selected.
- Draw a smiley with black sketch/marker as above.
- Stick two big eyes on the smaller circles on green craft paper.
- Stick the above face to the letter using Elmer's glue.
- Using a medium sized brush, paint yellow and brown polka dots (scattered randomly) over the letter.
Letter G for Giraffe:
We chose the lower case for letter G
- Paint the letter in yellow. Let it dry.
- Give a few brown colored brush strokes over the letter, as to appear as brown spots of giraffe.
- Carve out two horns and two ears from a yellow colored craft paper using carving knife.
- Stick them to the letter from back of the letter and over the letter respectively using Elmer's glue.
- Place two eyes over the head using Elmer's glue.
Letter H for House:
Take the Upper case for the Letter H
- Paint it in the color of your choice. Let it dry.
- Add some embellishments like windows, doors etc. of your choice color using a thin brush. Let it dry.
- Carve out a triangle from yellow colored craft paper using carving knife.
- Paste the carved triangle over the letter H using Elmer's glue. We used Krazy glue by mistake and so you can see the spots. To avoid the spots use Elmer's glue.
- Paste a brown colored chimney as an embellishment at the back.
Letter I for India : Proud to be an Indian
I suggest you get an Upper case for Letter I for more visibility of Ashoka Chakra.
- Needless to stay, what are the colors used.
- Used a coin to draw the chakraa.
Sorry, we didn't have a better white.
Letter J for Jelly Fish:
- Paint the letter capital J in turquoise blue (color represents aquatic creatures if I am not wrong). Let it dry.
- After it dries, paint few dots over the letter with the color of your choice , I chose red, because I had red satin ribbon at home.
- Carve out a hat from the craft paper of the same color as used above.
- Cut a single satin ribbon along the length into thinner ribbons and paste them above the head using Elmer's glue.
- Paste the hat on top of the letter as shown above.
Letter K for Kite :
- Draw few clouds with pencils over the white colored letter.
- Leave out the cloud part and paint the rest in sky blue color. Let it dry.
- After it dries, paint a black thread using a thin brush as shown above.
- Carve out three different sizes of diamonds from three different colored craft papers using carving knife. Or you could just carve out one color diamond and paint the inner diamonds with colors of your choice.
- Don't forget to carve out the tail along with bigger diamond.
- Paste the kite that was made above, to your letter.
Letter L for Lamp:
- Use the colors of your choice for the letter and craft paper.
- Paint the letter, let it dry.
- Carve out a trapezium to appear as a lamp frame from a colored craft paper of your choice.
- Stick the paper to the letter using Elmer's glue.
- Cut a white Chenile stem and paste it to the trapezium using Krazy glue.
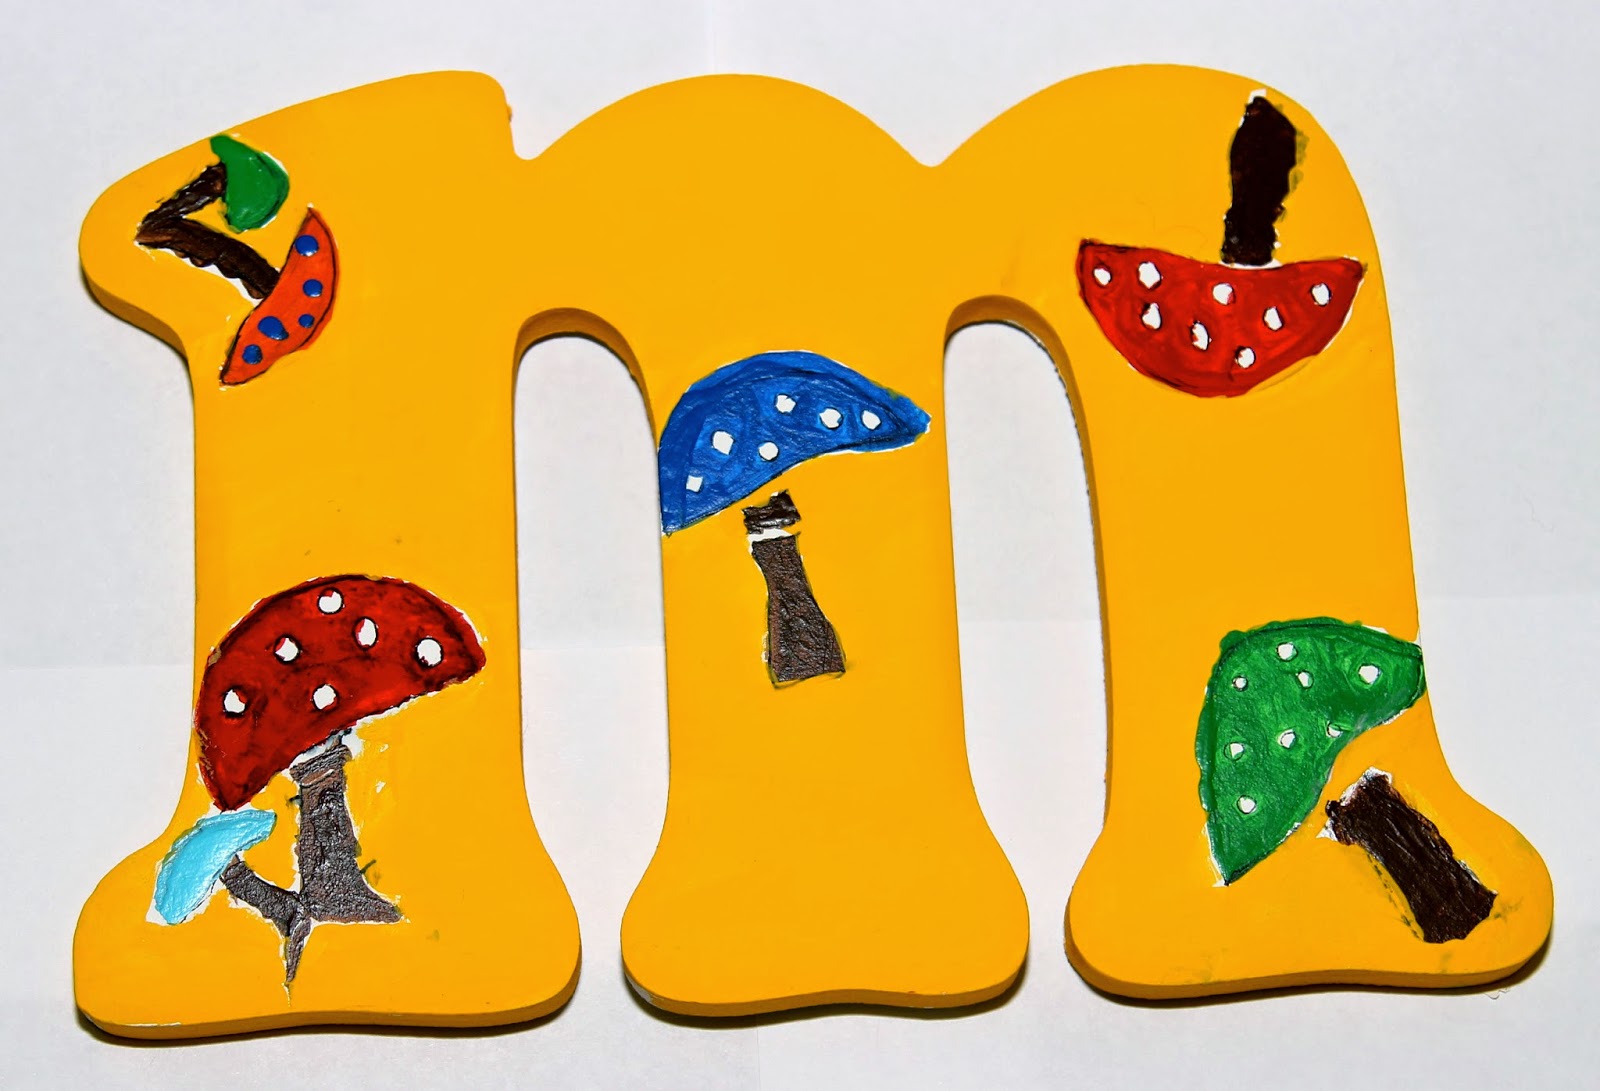
Letter M for Mushroom:
- Trace out mushrooms along with circles, of your choice of size on the letter.
- Paint the letter leaving behind the mushrooms with yellow color.
- Paint the mushrooms with your choice of colors using a thinner brush
Letter N for Night:
Using white colored N is suggested
- Firstly, trace out the stars and a moon over the letter using a pencil.
- Paint the letter N in black leaving out the stars and moon. Let it dry.
- Leave the stars as is.
- Paint the moon in yellow color and some embellishments like eye and mouth to the moon as shown above.
Letter O for Owl:
- Paint the letter O in brown. Let it dry.
- Cut two orange colored chenile stems and bend them to form legs as shown above.
- Stick to above stems to the letter at the bottom from back using Krazy glue.
- Carve out a triangle and two wings as shown above from the orange colored craft paper.
- Paste them to the the letter as it dries using Elmer's glue.
- Stick two big eyes over the triangle.
Letter P for Peacock:
- Paint the letter in bright blue color. Let it dry.
- Cut two small orange colored chenile stems and bend them to appear as legs.
- Paste the legs to the peacock from behind at the bottom using Krazy glue.
- Carve out beak and crown from the orange colored craft paper using carving knife.
- Paste the beak and crown carved above at the back of the letter as shown above using Elmer's glue.
- Paste the peacock feathers at the side as shown above using elmer's or krazy glue.
Letter Q for Queen:
Inspired from the character Queen Elsa in Frozen, I chose purple color.
- Paint the letter with the color of your choice. Let it dry
- Carve out a small circle and a crown from the gold colored craft paper.
- Paste the crown and circle as shown above using elmer's glue.
- This is optional. Using a yellow satin ribbon , try making a robe out of it. We couldn't hit the target :(
Letter R for Rainbow :
- Draw an outline for two clouds , with a rainbow appearing between the clouds and sun at the corner.
- Paint a part of the letter with blue to represent sky leaving out sun, rainbow and clouds.
- Do not paint clouds, leave them as is.
- Paint the rainbow in 7 colors using a very thin brush .
- Pain the sun in orange color using a very thin brush.
- Add few drops of water using dark blue color.
- It is your choice to add embellishments like mud and grass.
Letter S for Snowman :
Sorry we dint have a better white color :( Need to paint them again.
Again inspired from Frozen character "Olaf"
- You needn't paint the letter in white if you have white colored letters.
- Paste two buttons as eyes
- Paste few buttons on the bottom half of S to represent dress.
- Carve out cap and nose from an orange colored craft paper.
- Cut and glue small pieces of Chenile stems to make hands as shown above.
- Paste the carved out cap and nose on the upper half of the letter using elmer's glue.
- Stick the hands on the sides at the back of the letter to represent hands.
Letter T for Traffic Light.
- Draw three circles using a coin one below the other.
- Paint them in Green, orange and red as shown above.
- Paint the rest space in black.
You could also paint your street's name over the green space. We did try, but we didn't have stencil for that..
Letter U for Umbrella:
- Carve out an umbrella (do not include stick if you are painting the girl) from a white colored craft paper.
- Paint the carved out umbrella with the colors of your choice (use bright colors to pump it up).
- Let it dry.
- For an embellishment, we drew the outline a cute little girl holding umbrella as shown above.
- Paint the little girl in color of your choice. Let it dry.
- Paint the rest of the letter with a pink color . I didn't have pink. But, pink woudl be much prettier.
Letter V for Vegetable Cart:
Vegetable cart could have wide variety of vegetables and fruits. We couldn't do much because of the space constraint.
- Draw one horizontal line.
- Paint the area below the line with a darker brown.
- And above the line, draw the outlines for vegetables such as eggplant, pumpkin, carrots brocolli, cauliflower ,capsicum, tomato etc .
- Paint the vegetables with the appropriate colors.
- Paint the rest with a lighter color, leaving it plain white was not as good as this one.
- You can add embellishments such as cart wheels using buttons of your choice.
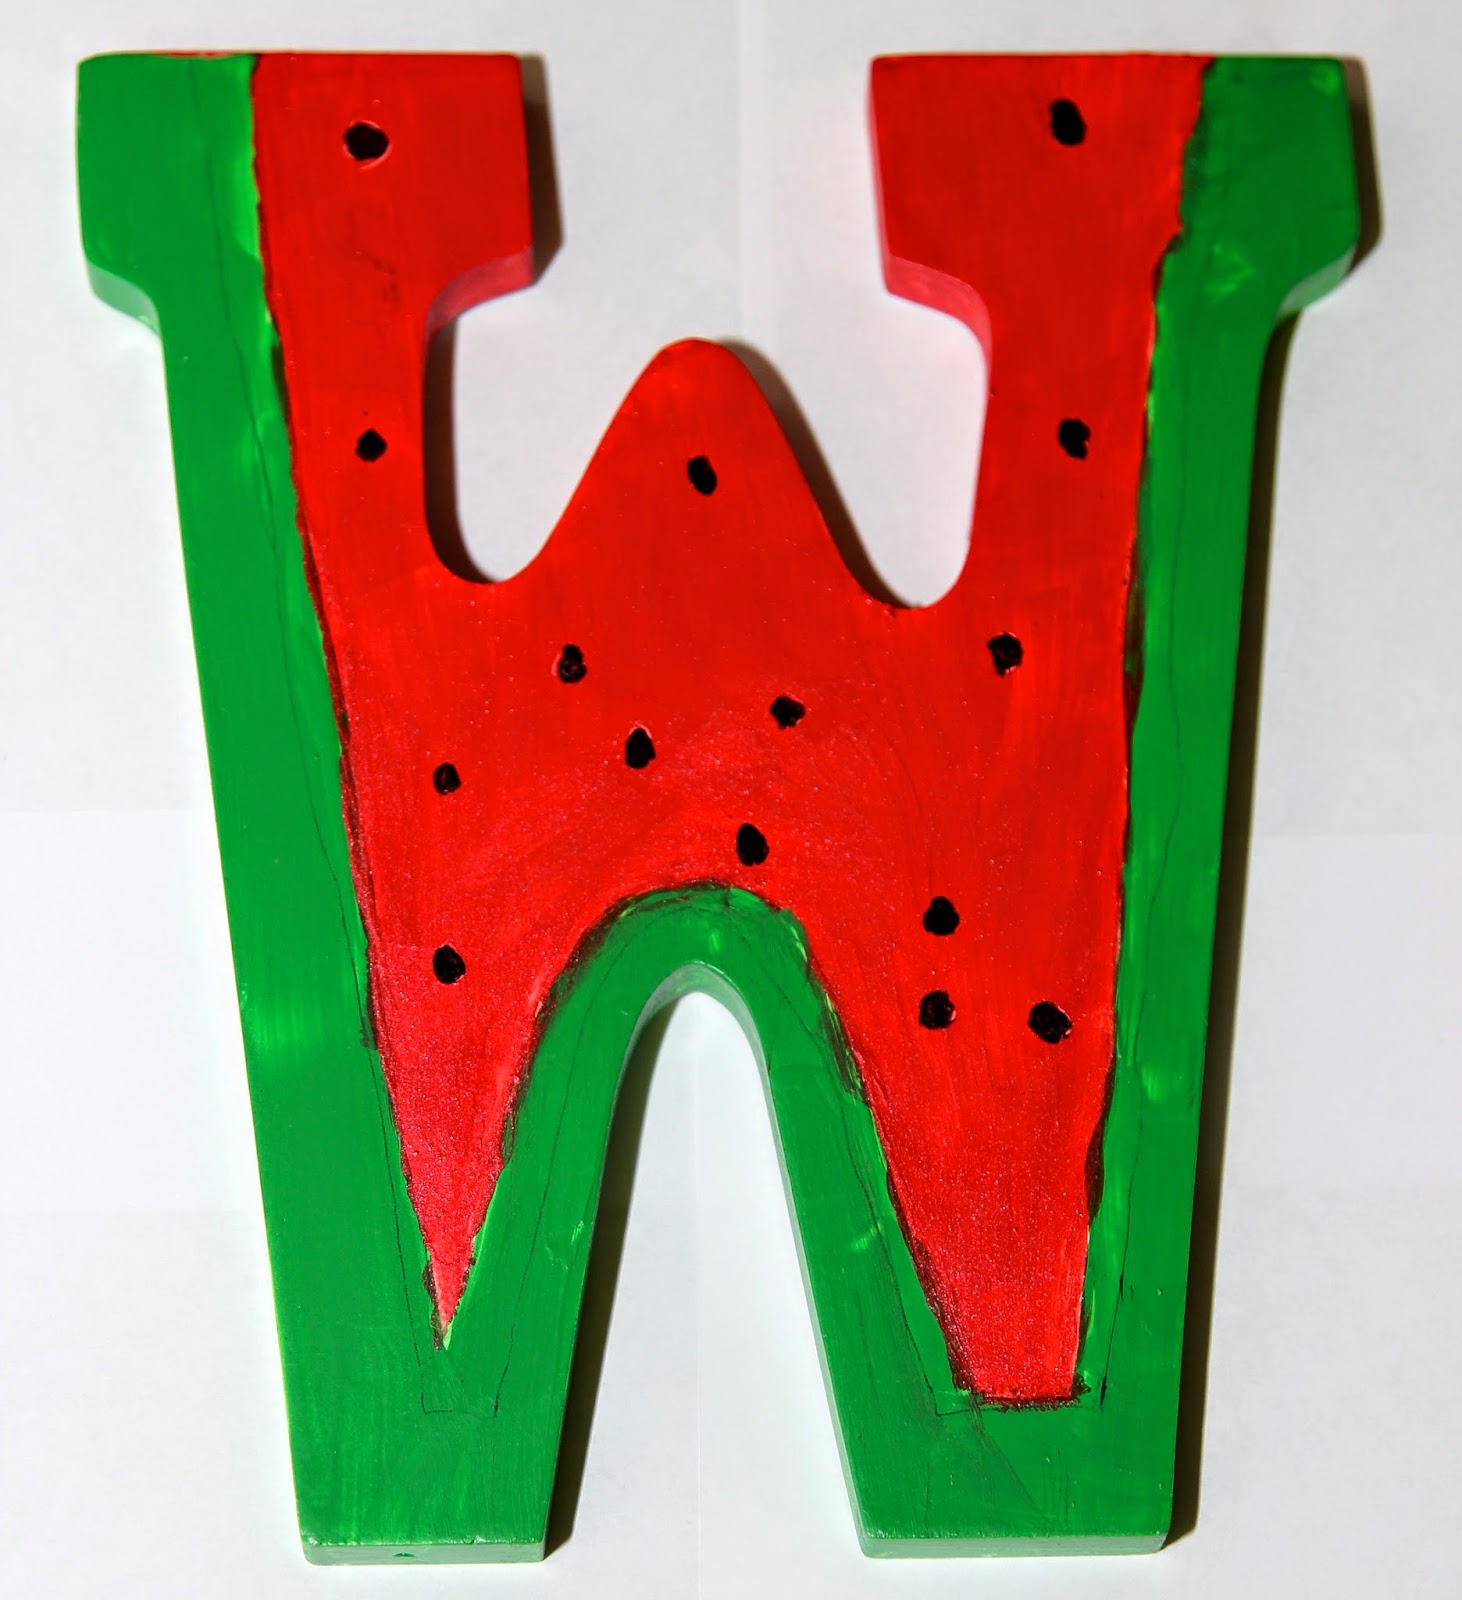
Letter W for Watermelon:
- Draw a 1 inch width border line for the letter W.
- Fill the border with green paint, to represent the skin of the melon.
- Paint the rest with red color.
- When the paint dries, paint seed size black spots over the red area to represent the black seeds.
Letter X for Xylophone:
You will need the colors present in the xylophone, we painted the colors in the same order as seen on a xylophone.
- Take a brush of the desired width and stick to the same brush for all the colors.
- Paint all the colors leaving a little space between each color.
- When the paint dries, paint white dots at both the ends of each color.
Letter Y for Yarn:
- Draw a circle on the letter Y using a pencil before anything.
- Paint the circle with a lighter color. Let the paint dry.
- Draw few curved lines (similar to longitudes on and latitudes on a globe) using a dark color.
- Add the embellishment such as two crochet needles as shown above and paint it the color of your choice. Leave it for drying.
- Paint the rest of the letter with a bright color.
Letter Z for Zebra :
- Give few brush strokes of black color over the letter to represent the black lines on zebra.
- A Dot to represent eye
- Paint the tip of the Z with grey color to represent the nose with a dark dot to represent nostril.
- Carve out black crown from the black craft paper to represent hair.
- Paste the crown on top the letter to represent hair.
- Carve out an ear from white color craft paper using carving knife and then u could paint black for the inner thing shown above.
- Now stick the ear which you made above next to the hair on top of the letter.
- Cut a small color chenile stem, bend it over to represent the tail .
- Stick the tail to the letter using Krazy glue.
Paste all these letters on the wall (Please dedicate one wall of your kids playroom or nursery for a better look) using 3M Command strips. Initially get a sample of command strips and test it to see if it holds the letter good.
I hope you like it. I am sure you all are gonna enjoy doing this. Good luck :)
No comments:
Post a Comment